Running Neo4j on a Windows Server 2019 Core Server
One of the things which puts people off of Windows (and this likely won’t solve it, but hey!) is that it’s seen as BLOATWARE. Needing lots of RAM just to start up. Largely, that’s due to the UI, and whilst personally, I’m ok with the trade off (I think 2GB to be able to see what you’re doing is OK), not everyone is of that opinion. Also, there’s a shed load of things that don’t need a UI. Now, I’m not going to set up a server with SSL, the correct domain access etc – as that’s way beyond the scope of this, but I will get one up and running with Neo4j.
Java as a platform works just fine on Windows now, performance wise – there’s not much in it, the biggest difference is likely the cost of licenses – i.e. Ubuntu is free, Windows Server – not so much. But you might have licenses, and indeed engineers/admins who are already experienced in Windows, and don’t really know Linux (ahem – like me).
Things to note, there are things Windows doesn’t have by default, most notably, an ‘in-powershell-editor’ sigh – I remember good old edit but apparently, that’s not been available on x64 systems for ever, so we’ll put an editor in place for that, we’ll also be using a script to download and setup the whole thing, as it’s a lot easier than manually doing it – if you’re interested, you should be able to parse the script files to see what they are doing.
I’m going to start on the principle that you have got Server 2019 (I’m using 20H2) installed and you’re at the initial ‘admin’ prompt, in ‘Command Prompt’ (shudder). I am setting this up for me to use, so I’ll be setting some defaults that I want, you may not want/nor need to do it, but I like it, so :p
1. Install SSH
I want to SSH to my server, whilst I am running it in VMWare and so can do it via remote, I’d rather just open up MobaXTerm and connect in. To do that we need SSH to be setup, so first, just to check it’s not already installed (as of 20H2, it’s not be default), start Powershell:
C:\> powershell
Now run:
Get-WindowsCapability -Online | ? Name -like 'OpenSSH*'
You should see if it’s installed or not, if either aren’t then run the appropriate commands below to install: (for example, I only had to install the server)
Add-WindowsCapability -Online -Name OpenSSH.Client~~~~0.0.1.0
Add-WindowsCapability -Online -Name OpenSSH.Server~~~~0.0.1.0
Now that’s done, we need to start the service, and set it to run automatically:
Start-Service sshd
Set-Service -Name sshd -StartupType 'Automatic'
And we also need to make sure the Firewall is open to allow us to SSH, a rule should have been created when the server was setup:
Get-NetFirewallRule -Name *ssh*
If you don’t see the rule OpenSSH-Server-In-TCP then you need to create it using:
New-NetFirewallRule -Name sshd -DisplayName 'OpenSSH Server (sshd)' -Enabled True -Direction Inbound -Protocol TCP -Action Allow -LocalPort 22
2. Change the computer name
We’re nearly able to SSH, and you’ve got 2 options here, 1 – just use the current computer name, which will be a randomly generated string, and you’ll get that by running:
$env:computername
So – either use that, or change the computer name (which will force a restart):
Rename-Computer -computername 'NAME FROM ABOVE' -newname 'NEW_NAME' -force -restart
3. Update PowerShell You don’t need to do this
SSH to your server (or carry on using your VM host) – I use SSH from MobaXTerm as it allows me to do Copy/Paste easier, anyhews. To update to the Core version of PowerShell first download it:
PowerShell
curl -Uri https://github.com/PowerShell/PowerShell/releases/download/v7.1.0/PowerShell-7.1.0-win-x64.msi -OutFile "PowerShell-7.1.0-win-x64.msi"
NB. Curl fans out there, in PowerShell 5 (default for Server 2019) is actually an alias for Invoke-WebRequest – but in Core, it’s actually curl.
Anyhews, once we have that, we need to quiet install, and we’re going to Wait for the installer to finish:
Start-Process msiexec.exe -Wait -ArgumentList "/package PowerShell-7.1.0-win-x64.msi /quiet ENABLE_PSREMOTING=1 REGISTER_MANIFEST=1"
4. Set PowerShell as the default
I mean, it’s 2020, why PowerShell isn’t the default normally is a mystery to me. Anyhews, we have two places to set it – one is for the VM connection (which you may not need if you never intend to connect that way – but it might be useful), the other is for the SSH users out there:
#VM Users
Set-ItemProperty -Path 'HKLM:\Software\Microsoft\Windows NT\CurrentVersion\WinLogon' -Name Shell -Value "c:\program files\powershell\7\pwsh.exe"

#SSH Users
New-ItemProperty -Path "HKLM:\SOFTWARE\OpenSSH" -Name DefaultShell -Value "c:\program files\powershell\7\pwsh.exe" -PropertyType String -Force
5. Install Micro-Editor
This is from here, and it gives us an editor inside PowerShell, which is what we want.
Install is probably too big-a-word for it, first we’ll download the release for us:
md C:\tools
PowerShell -command "& { (New-Object Net.WebClient).DownloadFile('https://github.com/zyedidia/micro/releases/download/v2.0.8/micro-2.0.8-win64.zip', 'c:\tools\micro-2.0.8-win64.zip') }"
Expand-Archive -Force "C:\tools\micro-2.0.8-win64.zip" "C:\tools\micro"
We’ll want this to allow us to edit the neo4j.conf file if we want to, and it’s nice to be able to edit locally. We should also add this to the PATH so we don’t have to know where it is all the time,
$oldpath = (Get-ItemProperty -Path 'Registry::HKEY_LOCAL_MACHINE\System\CurrentControlSet\Control\Session Manager\Environment' -Name PATH).path
$newpath = "$oldpath;C:\tools\micro\micro-2.0.8"
Set-ItemProperty -Path 'Registry::HKEY_LOCAL_MACHINE\System\CurrentControlSet\Control\Session Manager\Environment' -Name PATH -Value $newpath
You’ll now be able to run things like:
micro neo4j.conf
and edit within the SSH session. Obviously, you can change this to your editor of choice – vim etc
6. Let’s add a non-admin user:
The first line below will allow you to enter a password without the world seeing it, I mean – on your own VM for testing, you probably don’t need to do it – but good practices and all!
$password = Read-Host -AsSecureString
New-LocalUser "USERNAME" -Password $password -FullName "User Name"
7. Restart the computer
This get’s all our settings sorted.
Restart-Computer
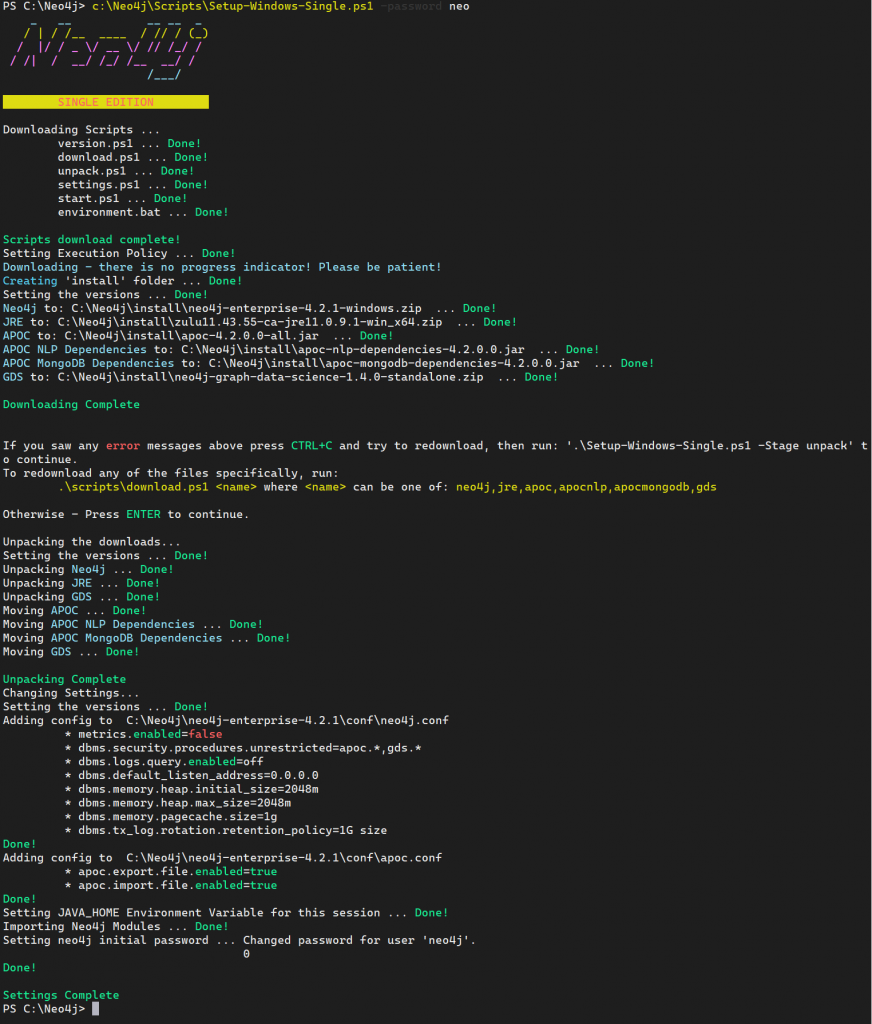
8. Install the Neo4j server & extras
We’re going to download a script that will download all the appropriate programs (Neo4j Server, Java 11 etc) and configure things so we’re all ready to go. NB. The step where we cd into the C:\Neo4j folder IS IMPORTANT
md c:\Neo4j
md c:\Neo4j\Scripts
cd c:\Neo4j\
powershell -command "& { (New-Object Net.WebClient).DownloadFile('https://raw.githubusercontent.com/tomgeudens/practical-neo4j/master/scripts/fourohandbeyond/windows/Setup-Windows-Single.ps1', 'C:\neo4j\Scripts\Setup-Windows-Single.ps1') }"
Once we have that, we can execute it using:
.\Scripts\Setup-Windows-Single.ps1 -password neo
This will set the default neo4j user to have the password neo
9. Change the scripts config
By default – it will allocate a heap of 2 GiB, and 1 GiB of page cache, I’ve been memory sensitive and only allocated 2GiB in total to my server, so if I run Neo4j now, it’ll use it all up and b0rk.
Which is why we have micro
micro c:\Neo4j\neo4j-enterprise-4.2.1\conf\neo4j.conf
Go all the way to the bottom of the file and change the memory settings so they fit in your server, in my case, Heap = 256M, PageCache = 256M
Quick Micro tips
- Backspace doesn’t work, use Delete instead
- CTRL+S saves
- CTRL+Q quits
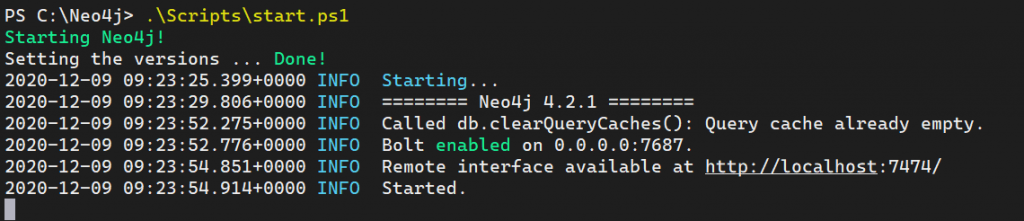
10. Start Neo4j
We’re going to run this in console mode initially, allowing us to see it’s all ok, so run:
.\Scripts\start.ps1
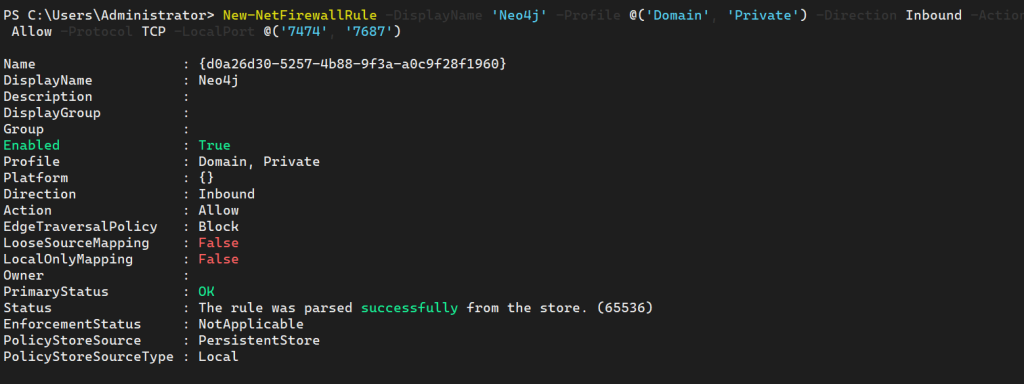
11. Allow the Firewall to have access (Admin)
Right, we’re nearing the home stretch, we need to add a Firewall rule to allow us to access the server, which we have to do as an Admin.
Obviously, for a production environment, you’d set this all up properly, in particular the Profile – here, I’ve used 'Domain' and 'Private' – which means your network connection needs to be one of those, ideally, it would be one of those.
New-NetFirewallRule -DisplayName 'Neo4j' -Profile @('Domain', 'Private') -Direction Inbound -Action Allow -Protocol TCP -LocalPort @('7474', '7687')
12. Set the Network profile to be ‘Private’ (Admin)
By default the connection you are on will be Public – which means the Firewall will block connections via our new rule, so for me, I’m going to change the network to be Private as it’s my own internal network and that’s accurate.
First, I need to get the network adapter name:
Get-NetAdapter

Now we have that, we need to get the current profile, which should be public:
Get-NetConnectionProfile -InterfaceAlias Ethernet0
and lastly, set it to the Private category to allow our rule to work.
Set-NetConnectionProfile -InterfaceAlias Ethernet0 -NetworkCategory Private
13. Test it’s working
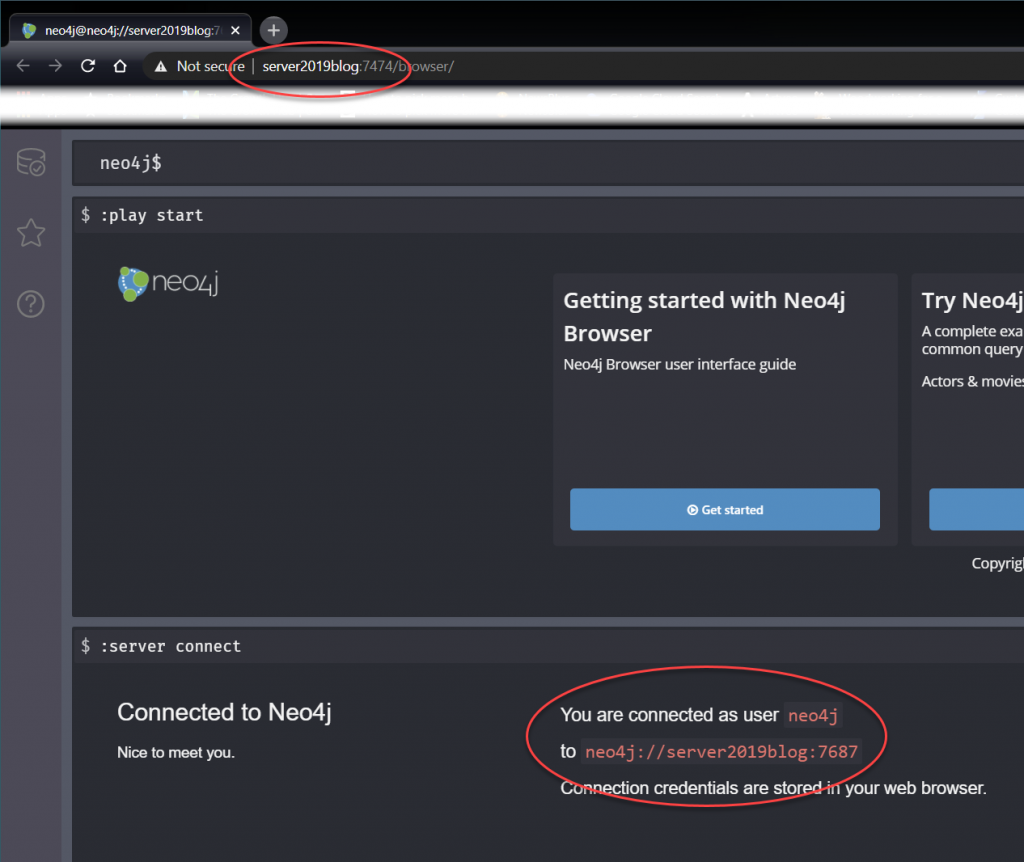
On your machine, you should be able to go to http://<your_server_name>:7474/ and connect.
[…] the last post we looked at running Neo4j on a server running Windows Server 2019 Core. But what we did was run it […]